
Over the course of several decades OS MAX has continually updated and refined their engine offering for helis. And it’s my opinion the OS Max 46FX-Hring, 50SX-Hring, 50SX-H (Hyper), 55HZ-H, and 55HZ-R (DRS) are the sweetest running series of engine I’ve ever had the pleasure of owning and operating.
In this next photo, we present the 46FX-Hring, 50SX-Hring, plus a 46FX (the airplane version of the heli engine). This, so you may see the relative difference in size between airplane and helicopter engine heads.
And allow me to apologize for the poor image quality, but I took this photo more than 20 years ago for another purpose. Fortunately, in the intervening years both cameras and my skills have improved – meanwhile, it still conveys the concept.

![]()
Beginning with the Hyper-series in early 2004, they switched to a machined head anodized initially in blue, and subsequently, in black. These heads have more cooling fin area and exist for the purpose of improving cooling. This, because OS had long experience with car engines where low airflow over the cooling fins dictated the use of heads with huge cooling fins. It was a welcome improvement.
Two things made the 50SX-Hring differ from the 50SX-H Hyper. Beyond the aforementioned larger head, the carb throat of the original 50SX-H is 8.5mm in diameter versus 10mm in diameter for the Hyper variant. The larger bore 60L allowed more air to flow than the 40E and thus, allowed more fuel to be consumed.
This is the sole reason the Hyper makes slightly more horsepower because otherwise, there were no internal changes.

![]()
So I’ve still got an OS46FX-H installed in a Concept 46VR, plus a couple each of the 50SX and 50SX-Hyper engines and still find them all to be extremely reliable, and rock solid, performers. And over the years I’ve added several 55HZ-H plus one HZ-R (the one with DRS) to the fleet.
Honestly? The larger displacement engines are wasted on me because they're just more cowbell horsepower-wise, which I don't need for how I fly my models. Anyway, reason I keep buying engines from OS because I like their ease of handling and tuning for my helicopters.
Note; this is purely a reflection of my personal opinion because as we say in the south; I don’t have a dog in this fight (because I’m not in the business of making or selling these engines).
Anyway, I have a fair bit of experience with glow engines, which may help you so I’m sharing my 2¢ on what to do when your engine is running a little sickly, or in need of repair.
Next we’re going to delve into bearing replacement, and touch on piston ring replacement, too.
FIELD TROUBLESHOOTING
Look, if you go to start the engine and it’s running poorly compared to last time, just because you have a needle valve servo to make adjustments remotely is no excuse to give in to the temptation of making an adjustment. Try hard not to do this because engines don’t just suddenly run poorly. The engine is talking to you saying something’s wrong. Trust it.

![]()
So while you’re at the field, the order in which I troubleshoot goes something like this;
o Install a new glow plug
o Check the fuel filter
o Check for air leaks at feed and pressure lines
o Suck at carb nipple
o Try fuel from a different batch
o Check bolts (backplate x4, carb x1, head x6)
These six steps are the first things I'll try before adjusting the needle because it's been my experience one of these will often resolve the problem of the engine not running like it should (or was immediately before). What differentiates a rookie from an experienced modeler is a rookie’s first move is to tweak the needle valve instead of looking for what’s actually causing the issue. Heads up.
Anyway, while this is the rough order of the steps I follow, the fact is because of my experience I may skip a step depending on symptoms. However, if none of these steps resolve the issue, then it's a pretty good bet you’re going to either field strip the carb to look for debris, or work on your engine back at the workshop. You may find the Carb troubleshooting article helpful.
Note; sucking at the carb nipple requires a 6” piece of fuel line. Reason to try this before blowing fuel through it is trash may be blocking the needle and you may be able to dislodge it back into the fuel line by sucking (and there’s nothing, or virtually nothing, fuel-wise so suck hard without fear). And the alternative, blowing fuel through is also worth a try, but only after first sucking as fuel may lodge debris more firmly in place.
TOOLS AND EQUIPMENT
You’ll need a few basic tools and equipment. For engine disassembly you'll need both a 2.0 mm and a 2.5mm Allen driver, an X-Acto knife with #11 blade, a soft hammer, both a 6” x 3/8” and a 3”x 1” dia. dowel, a small board.

![]()
Note the prop drive puller in the above photo. Depending on what engine you’re disassembling, you’ll may need one of these, OS part number #71510009. This has worked for all engines, even other brands on which I’ve tried it.

![]()
You’ll also want an oven mitt or leather glove . . .

![]()
. . . as well as a 5/16” socket and driver for removing the glow plug.

![]()
Finally, you’ll also need access to an oven capable of reaching 350°, and a freezer capable of reaching 32°. A source of compressed air may be handy as well.

![]()
SAFETY ISSUES
You’ll be using compressed air, an oven, a freezer, and tools that may injure you. To the above list, you will definitely require eye protection, also!
Note; if the procedures described are beyond your experience, consider seeking more expert help. This white paper is not meant to be a complete and final instruction about engine repair. Use the information at your own risk!
![]()
REPLACEMENT PARTS
The scope of this white paper is limited to disassembly and replacing bearings, but you may also need gaskets, piston ring, rod, etc. depending on what you find. In my experience eBay is a great source of spare parts and bearings.

![]()
TERMINOLOGY AND ORIENTATION
Before we begin, let’s agree on terminology; top refers to the cylinder head side of the engine while front refers to the thread side of the crankshaft, OK? You’re going to disassemble the engine because if none of the field checks resolved the problem, and if there's no debris in the carb, then I rather suspect you’ve got a bearing problem.
The procedure will be to drop your engine out of the helicopter to work on it. Remove the engine while leaving the crankcase secured to the engine mount. Note: all screws on this engine are right-hand thread. Thus, CW (clockwise) tightens bolts (or closes the main needle valve).
REMOVE BACKPLATE
We’ll begin by removing the engine's backplate. Remove the four screws which secure it to the engine – note which way is up as you remove it. By the way, did the screws “pop” when you loosened them? This indicates they were fully torqued. If not, you may have simply had an air leak at the backplate.

![]()
A 2-stroke engines require compression, i.e. a sealed crankcase, along with air and fuel, plus ignition to run. If the seal is compromised, the engine’s ability to draw fuel is in trouble. As you ease the backplate off, be careful not to tear the paper gasket. Have an X-Acto with a new blade handy as it makes for a good tool to slip underneath a sticking gasket.

![]()
If you tear it, buy a new one because how to make a new gasket is outside the scope of this paper. Note the flat spot on the backplate faces toward the top (cylinder head). This flat spot provides clearance for the piston as it rotates to BDC (bottom dead center).
DETERMINE BEARING CONDITION
Now let’s examine the inside of the engine. Is it clean? How much rust is on the bearings? A little isn’t a big deal, but a lot of rust is a problem – have you been running your engine dry and using after run oil? Some guys say that due to synthetic oils you don’t need to oil your engines daily. In my opinion, they’re simply mistaken.
So in this next photo we’re seeing the usual condition of the bearings. There will almost always be surface rust on the outer race, but problems come into play if there’s rust on the balls themselves. And it’s so easy to check for this because if you rotate the crankshaft and feel ‘anything’ at all, the bearings are shot. Good bearings feel like nothing, as if the crank were rotating in butter – perfectly smooth.

![]()
I run my engine dry (by pinching the fuel supply shut at the end of flying) and oil it through the carb throat liberally with light machine oil, i.e. 3-in-1 or after-run oil. I do it every single time I'm done flying. Why? Because I really don’t know how long it’ll be before I fly the model again.
Anyway, a little oil never hurt a thing and trust me, the blow-by past the ring of the combustion residue will corrode bearings. Of course, it’s your engine so do as you please. I bought a 30ml squeeze bottle with Luer-lock needle for a few bucks years ago. The needles are widely available in various gauges and lengths for a couple bucks a pop.

![]()
Next, remove the glow plug. Rotate the engine through a few revolutions. I want you to develop a feel for nothingness. What I mean is that if you “feel” anything like a roughness of any kind whatsoever in the bearings as you rotate the engine, it’s time to replace them.
Note; this is not a subject for an argument, or discussion. If you feel can anything at all beyond “smooth as a baby’s butt”, then replace the bearings. Don’t try to be cheap and replace just one bearing either, do them both! Trust me, bearings are cheap and you’ll be cursing yourself for economizing on the few bucks they cost if you have to tear the engine down again. Believe me, I’ve been there, done that, so I’m trying to save you that experience.

![]()
Anyway, my bet is you encounter bearings, which are a little rough. And I don’t care which brand of engine you have, a rough bearing is a source of trouble, and the engine won’t idle as nicely as with new good bearings. I.e. it doesn’t really seem to matter about brand like OS Max, Thunder Tiger, Saito, Enya, Yamada (YS), whatever . . . rough bearings are trouble. They’re cheap, replace them!
Sources for replacement bearings include the hobby shop for OEM bearings (from the engine manufacturer), or a reputable miniature bearing supplier like Boca Bearing. Also, I’ve bought el cheapo no-name bearings off eBay, too and as long as the part numbers match up you’re good to go. And that nonsense about ceramic bearings is just that, nonsense.

![]()
REMOVE HEAD
Next, pull the 6 bolts securing the head. Again, do they “pop” when you loosen them? If not, then it's another good bet you have a leak here – remember, you need good compression (one of the requirements for a 2-stroke engine to run well).
The head’s orientation doesn’t really matter because the combustion chamber is symmetrical, but note the dished sides of these Hyper type heads go to the sides.

![]()
Next, lift the thin brass gasket off the sleeve, or from inside the head if it's stuck there. Use the tip of a sharp X-Acto – but – be very careful to not scratch it, or otherwise damage the brass gasket because the smooth surfaces are essential for sealing the combustion chamber.
Next, examine the brass gasket carefully for witness marks of leaking. This will be visible as a discoloration. In my opinion, if the engine's head has never been re-torqued following the first few runs, this may be a source of trouble. What I mean by this is that after the first few runs of the engine on the test stand, I re-torque all the bolts.
I check them again following initial break-in, i.e. before I install the engine into a helicopter. Those who follow my aboutENGINES segment on modelSPORT video-magazine know my preference of never matching a new engine and a new model since when I fly it, I don’t want to be worrying about the engine while I’m concentrating on the new model.
Honestly? It's because I only have one CPU (brain) so by nature; I am a single-tasker, i.e. one-thing-at-a-time kind of guy.
REMOVE SLEEVE AND PISTON/ROD ASSEMBLY
Presuming the bearings were rough, let’s replace them. It’s not really tricky to remove the piston and rod off the crankshaft but first, you need to remove the sleeve. After the sleeve is out, the rod lifts right off the crankpin.
But before you begin, wipe clean the top of the piston with acetone and use a Sharpie to make an arrow on the top facing forward. This, so you can reassemble the piston back as it was prior to your screwing around with things as we need the piston ring oriented to clear ports. This is important!
![]()
If you intend to replace the wristpin or piston, then mark the rod, also. But this time the mark will be on the back of the rod, i.e. the side that faces the backplate.
Anyway, if the sleeve is a bit stubborn to release, use a Popsicle stick through the exhaust port so it rests on the crown of the piston. Next, turn the crankshaft slowly and the piston acting through the Popsicle stick will raise the sleeve. Once it begins moving, then it comes out fairly easily with just your fingers. But whatever you do, DON'T USE METAL TOOLS FOR THIS as you don’t want to mar these surfaces in any way – you’ve been warned!
Note: there’s a tiny roll pin pressed into the very top of the crankcase. Its purpose is to align the sleeve so you can’t install it incorrectly.

![]()
Anyway, rotate the crank pin to TDC (top dead center) and holding your tongue just right, wiggle the piston and rod off the crank pin. Now eyeball the oil slot/holes in the big end of the rod. You’re looking to ensure they're clean and don’t have swarf or anything blocking the flow of oil. If so, clean it out. Then set the piston and rod assembly aside on a clean surface.

![]()
Note; don’t screw with the piston ring, just leave everything alone unless you’re replacing the ring for some reason (like it’s worn out due to ingesting airborne dirt and clutch liner dust). Of course, in this case, it’ll need a ring, too!
Ring installation tips
Anyway, if a ring is called for, then use 600-grit wet-dry sandpaper (the black stuff) wrapped around your finger and using a twisting in-out motion, you're going to hone the inner surface of the sleeve to prep the ring for break-in. A light coating of light machine oil between sandpaper and sleeve makes this all happen more easily.
Once you're done, you're looking for a light crosshatch pattern on the inner wall of the sleeve. Afterwards, using soap and water, wash thoroughly, lube again with light machine oil, and set the sleeve aside until you're ready to reassemble.
As for the ring, lift the old one out of the land and toss it. Start the new one at the roll pin and ease it around and in until it snaps into place. Easier done than said. Finally, make certain the ring gap is centered on the roll pin within the land.

![]()
REMOVE CRANKSHAFT
Now use a lead or brass hammer and tap on the nose of the crankshaft to remove the crankshaft from the two bearings. The reason to use a soft hammer body is to not damage the threads. I’m experienced and will (in a pinch) put a nut on the end of the crankshaft (to protect the threads) and using my judgment (and an ordinary steel hammer) use this to do the job – but I also know how much tapping is too hard.
With regard to this last, remember what Will Rogers said, “Good judgment comes from experience, and a lot of that comes from bad judgment.” You’ve been warned to go easy, eh?
Anyway, the crankshaft will usually slide out pretty easy. I usually forego the hammer and just tap the nose of the crankshaft on a block of wood and this eases it out. Also, and this is very important, look for witness marks on the crankshaft.
Witness mark is the term for scoring, or galling, on the part which indicates something is wrong. In this case, a witness mark may indicate the crankshaft was spinning inside the inner race of the radial bearing.

![]()
If all looks normal (like the picture), then as a dry run, take the new bearings and slide them onto the crankshaft. If the fit of the crankshaft within the inner race of the replacement bearings isn't nice and snug, consider using bearing & stud adhesive from Locktite, or similar . . . but be warned, the next time you go to disassemble the engine you’ll need a plumber’s torch for heating the area (to decompose the adhesive). It's been my experience adhesive usually isn’t necessary.
SIZE REPLACEMENT BEARINGS

![]()
So now we wait. Since metals changing size with temperature work, getting them cold works to our benefit by making them a little smaller. This means putting them back into the crankcase will be easier.
REMOVE BEARINGS
Now it’s time to remove the bearings. Preheat the oven to 350°. Put the crankcase in the oven for 10-15 minutes, or until the parts gets to 350°. I set the crankcase on the backside as often the rear bearing will fall out on its own due to gravity as the alloy case expands more than the steel bearing. If I hear that then I proceed to getting the front bearing out!

![]()
Meanwhile, go look for a small piece of board. Also, get yourself either an oven mitt or a leather glove with which to grab the crankcase because it’ll be hot as all get out and bad language is bad for your wife’s ears. After the crankcase is hot, and wearing the glove, grab the crankcase and tap the back of the engine on the board. The rear bearing will typically fall out (presuming it didn’t fall out while the engine was sitting on it’s back in the oven).
Next, while the engine is still hot, flip it over and use a 6” long piece of 3/8” wood dowel rod and knock the front bearing out using the hammer. It too will practically fall out.

![]()
So why does using heat and cold help? About now the guy who was sleeping in the back of science class the day everyone learned about coefficients of expansion is wondering why this works since the steel bearings and the aluminum crankcase are at the same elevated or reduced temperatures?
Naturally, the guy with a pocket protector has his hand up but I’m not going to call on him. Instead I’ll leave it as an exercise for the class to suss out why heating the assembly in the oven works to loosen the bearing from the aluminum crankcase (hint, aluminum expands more than steel). Anyway, trust me, this works!

![]()
REINSTALL BEARINGS
If the crankcase isn’t as clean as you want it, then now’s the time to wash it before installing the new bearings. Dish soap and water works fine! You want these parts clean enough to eat off of!

![]()
Note; if you’ve been running fuel with castor oil in the engine and want to remove the baked on brown crud, it’s time for the antifreeze trick (modelSPORT back-issue MS0101 has the details).
Anyway, remove the bearings from the freezer. If the crankcase is still hot, I trust you’ll remember to be wearing an oven mitt or leather glove when you hold the crankcase. If not, following your return from the emergency room, it’s time to insert the cold rear bearing into the case.
Look, it’ll probably just drop in very nicely with the case at room temperature so no gloves needed but if you need to warm it, wear the glove! Also, you shouldn’t have to do more than lightly tap it into place using the end of a wood dowel of suitable size sans hammer. Anyway, once the rear bearing bottoms out in the bearing seat, you’re done.
Next, place your forefinger into the back of the engine to hold the rear bearing in place and turn the engine over in your hand (this is to keep the rear bearing from falling out). Now install the cold front bearing. Maybe you have to tap the engine nose and bearing on the board to get it in, maybe not. It depends on how quickly you work.

![]()
Next, set the crankcase down gently (so as not to jar the bearings out of place) and let the assembly get back to room temperature.
Note; I don’t get in a hurry and instead, depending on whether the sun is over the yard arm, I’ll take a break while I wait and go have a beer, or a Coke.
REINSTALL CRANKSHAFT
It’s time to reinstall the crankshaft back into the engine. Insert the nose of the crankshaft in through the back of the engine. Guide it past the rear bearing and align it with the inner race of the front bearings. It should slide all the way home very easily – meaning with almost no persuasion
REINSTALL PISTON/ROD ASSEMBLY
Now slip the piston and rod back into the engine and over the crank pin – remember the arrow points forward. If you’re dumb and didn’t make a mark on the top of the piston like I told you earlier, then look at the mark you made on the backside of the rod (you did make a mark on the rod, right?).
If you didn’t then here’s where it gets a little tricky. Look into the ring land on the piston (the groove) and you’ll see a roll-pin. This pin is where the ring gap comes together. It’s an alignment device. It’s important to realize the ring gap shouldn’t ride through an opening, or port, in the sleeve.
![]()
Note; the ring gap must be continuously supported, i.e. the opening in the ring MUST ride on the steel sleeve continuously during the entire up and down stroke. If it goes over an opening, the piston is installed incorrectly, remove and turn the assembly around 180° because otherwise the risk isn’t just not maintaining a good seal, but of the ring end catching on the edge of a port and breaking. If this happens you loose compression and the engine doesn’t run – bad news!
So to save time, I’ll just tell you to make sure that when you look down into the engine through the top of the crankcase, i.e. looking down into the hole where the sleeve fits into place, if you align the nose of the crankshaft so that it faces up at 12 ‘o’clock, the ring groove is roughly at the 2 o’clock position – but now you know why I told you make a mark on it!
Anyway, with the crankpin at TDC, make sure the ring gap aligns over the roll pin in the piston land and insert the rod down into the engine. Lift the big end of the rod into place onto the crankpin and press it home with your finger.
REINSTALL SLEEVE
It’s time to re-install the sleeve over the piston and you don’t want to break the piston ring while doing it. First, look for another roll pin, but this time it’s installed into the top of the crankcase. You'll remember it serves to align the sleeve so that the ports in the sleeve align with the passages in the crankcase.
Look for the notch in the sleeve and align everything.

![]()
Now you need to carefully slide the sleeve over the piston. Work carefully and rock it a little bit until it slips over the top of the ring and thereby compresses it into the piston’s ring land.
Look carefully at the bottom of the sleeve and you'll notice it has a taper machined into it. The purpose is to evenly compress the ring into the ring's land.
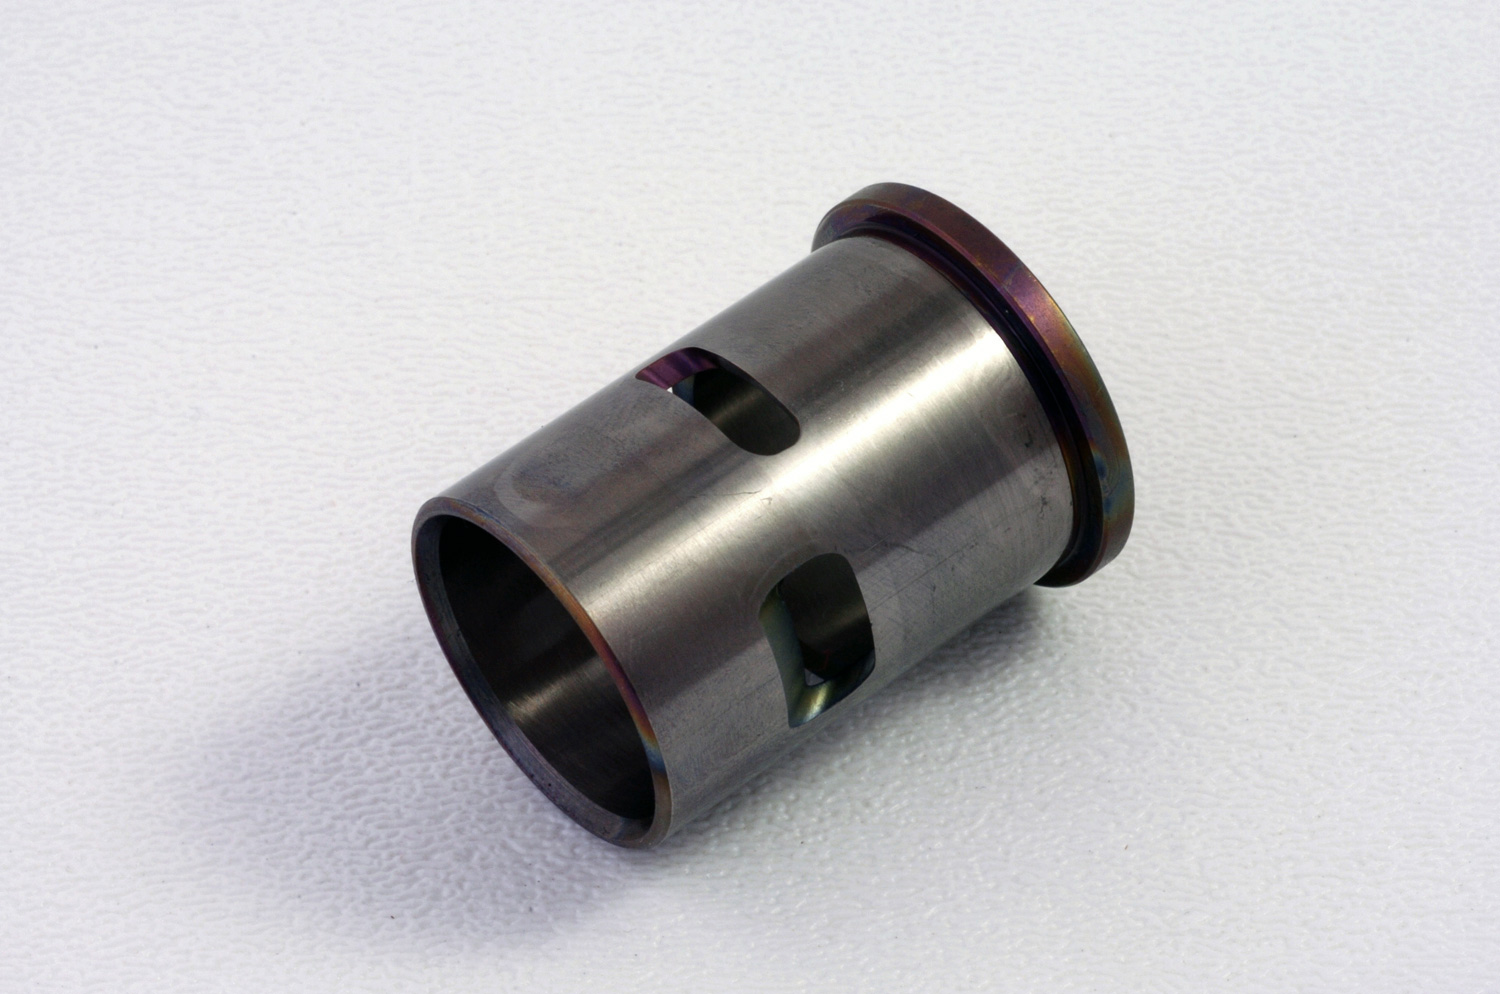
![]()
Note; you MUST make sure the ring gap aligns over the roll pin in the piston land or the ring will break. You’ve been warned.
Anyway, continue to slide the sleeve over the top of the piston and compress the ring. I use light machine oil (3-in-one) to make this whole process easier.
Once the sleeve begins going down, we’ll align the notch in the sleeve with the roll pin just before it seats home. So continue inserting the sleeve into the crankcase; just try to have the alignment between notch and pin in reasonable alignment as you slide the sleeve home (until if fully seats).
Note; the top of the sleeve is what the cylinder head and brass gasket will actually seal upon when you install the brass gasket and cylinder head.
REINSTALL HEAD AND BACKPLATE
OK, we’re almost done. Ensure the brass head gasket and the paper backplate gasket are in good shape then re-install the head and backplate. Do the head first and tighten the bolts evenly using a crossing pattern.
Self-promotion alert: If you don’t know how or why to do this, get off your wallet and buy one of these DVDs. Runs 3-hours, cost 20 bucks, you’ll learn lots.
RCB003 aboutENGINES

![]()
Anyway, when the head bolts are tight, rotate the engine a few times to make sure everything is moving smoothly – like it should. Once I’m satisfied with this, I reinstall the backplate and tighten these bolts using a crossing pattern also.
GLOW PLUG
Install a new glow plug. I like 30% nitro and thus, use either an OS #8 or an Enya No.3 plug. My actual preference is for the Enya, but you do you. Just ensure there’s no swarf in the threads within the head before installing the plug. And no matter what, always use the new copper gasket on the glow plug!

![]()
ProTip: if the engine is installed, a short piece of fuel tubing slipped over the center electrode of the glow plug has just enough grip to get the plug started before putting a socket on it. Cross-threading the head is going to cost you money! Anyway, tighten, and please don’t be a gorilla while you’re at it, 6-8oz-in is plenty!
REINSTALL CARBURETOR
Reinstall the carburetor onto the engine. Insert the nifty composite washer, which fits at the bottom of the crankcase where the carburetor bottoms. While there are some who will suggest leaving this off, I’m of the opinion that if it were a superfluous part OS Engines would have never installed it in the first place!

![]()
Anyway, after eyeballing to ensure the rubber o-ring is in satisfactory condition, install it onto the base of the carb. Make certain it didn’t get rolled up as you did it because if it becomes deformed it may impede the seal. Finally, align the carb and press down on it with your thumb to ensure the o-ring makes a good seal with the crankcase and tighten the draw-screw.
Wrap up
That’s it, you’re done. It’s time to return the engine to service.


