
P6 flybar head - tuning tips
Should you build your model with or without the flybar?
Depends on your budget and your appetite for complication. To this day I like how quick and easy it is to set up a new model whilst relying on a cheap single-axis gyro. Especially because your model will feel and fly the exact same-same whether it relies on a hybrid gyro (mechanical-single-axis electronic gyro) or all-electronic 3-axis gyro for model stabilization.
Our advice? We feel there’s a lot to be said for sticking with a single-axis, plus mechanical gyro (flybar) setup. And if you have a burning desire to learn more, then play around with the adjustments. And this is the purpose of this briefing, helping you get your feet wet by teaching you want the adjustments actually do.
Note; it’s important to recognize you don't need to do ANY of these adjustments because out of the box most folks are delighted with how their Pantera P6 flies.

![]()
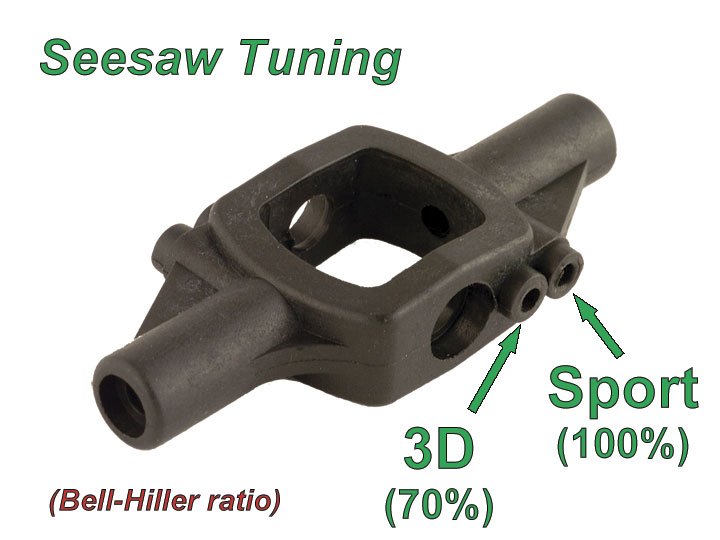
First up there's the seesaw. The seesaw arms mount to the seesaw, and where they mount makes a difference in handling because this determines the Bell-Hiller mixing ratio. There are two positions, one for sport (100% Bell-Hiller ratio), the other for 3D (70% Bell-Hiller ratio). To change from one to the other takes but a moment because all you do is unscrew the seesaw arms and move them from one position to the other. Then perform a test hop and see if you like the difference. Easy peasy!
![]()
This next image shows the seesaw arms we're talking about. Note they have 3 positions for mounting the ball linkage pickup points (where the linkage from the swashplate attaches). Basically, the middle position is where most folks like it but it's dead nuts easy to adjust the feel based on whether you're a beginner, sport pilot, or more into performing 3D maneuvers. How? Just by unscrewing and moving the ball.

![]()
As it happens, there are also adjustments you can make to change the throw itself coming off the swashplate. This is just like using a longer servo arm to increase throw (e.g. works the same way).
So for this we turn to what are called swashball spacers. We have them in several different lengths depending on what you want to accomplish. For example, in this photo are AUD0065-27, which are the ones prefered by folks using their P6 to practice F3C maneuvers. We have longer ones for folks interested in 3D.

![]()
Beyond this, you can also select between two positions for installing the flybar paddles, the forward position for sport, the aft position for 3D. And note, while 3D will never use them, sporting pilots and F3C competitors will attach flybar weights to further fine tune the handling depending on their goals.

![]()
Gyroscope: single-axis
And we'll close with this; gyro-wise, just as with RF-systems, we don't have a dog in this hunt because we don't make these things. If you're sticking with the 2-axis mechanical gyro for the rotor head, then a Futaba GY470 is a sweet single-axis gyro that's reliable, inexpensive, and works well.
Note; while Futaba hates us saying this, don't overlook a used GY401, GY501, or GY601 if it hits your radar - I certainly wouldn't. Especially as all of these single-axis gyros are solid state and thus, pretty much bulletproof.

![]()
What's more, a huge benefit of a single-axis gyro is you'll only adjust gain for the hover (typically around 70%), and then adjust gain for forward flight (something less, approximately 50%), and that's it . . . no more screwing around with the gyro!
Me? I can lift off a brand new model, track the blades, and confirm the gain for hover, go into forward flight and if needs be fine tune gain once again, lift off confirm and then shoot an auto to landing - all on the first flight and with half a tank of fuel remaining! If you're a virgin it takes longer but anyone with experience will replicate this, easily. Afterward? That it . . . just fly, fly, fly because you'll be done with adjusting things. It really is this easy.
![]()
Gyroscope: 3-axis
If you're unaware, the first 3-axis gyros were literally some guy who installed three separate single-axis gyros on his model. Then two things happened. First, because the accelerometer modules are dirt cheap (they're used within cell phones) others rushed to copy his achievement.
In turn, this birthed the whole FBL movement as a slew of guys rushed to compete with the establish players like Futaba and JR. The second thing that happened is the heli-manufacturers fell all over themselves to eliminate the flybar mechanism. This, because fewer parts meant less expense improving their competitive position. Yet interestingly . . . kit prices didn't come down - go figure!
This last is important because while ever cheaper FBL gyros keep hitting the market, and while it pains me to admit, the truth is the more you spend for your FBL unit, the better they are. Saying, yes a pricey V-Bar Neo or Futaba CGY770 are worth every penny.
And no, I'm not talking down other brands like Radiomaster, Ikon, Align, Bavarion Demon, Spektrum FBL, and whatever else may be flavor of the month, just saying the Neo and 770 are top dogs for a reason. That, and no matter what, they all have fans (and haters). Just remember this; the P6 doesn't know (or care) what model/brand gyro you elect to use, so do what's best for your budget and level of skill.
Last thing; you win regardless of whether it's stabilized with a mechanical or electronic gyro because it's still going to be the same-same sweet handling P6!


