
Your Pantera P6 is on the way. While you await its arrival, here’s a preview of what's in store, e.g. what you need to get ready, and what you'll receive.
Getting ready
First things first, make good use of your time. We advise downloading the assembly manual, exploded view drawings, plus the setup guide for review. Eyeballing this material ahead of time is a great dry run in preparation for your build.
And by way of heads up, it won’t take long to suss out how things go together. Point being, do your homework and when the brown truck pulls up to drop your box off, you’ll hit the ground running as you take the first step on a happy journey!

![]()
What you get
Hopefully you’ve prepared by getting a spot on the workbench cleared off. Then after opening the box, what you’re presented with are several numbered bags.
These include canopy, rolled decals, side frames, and more!

![]()
Everything's well packed and organized because we know what we're doing. As for proof we're good at it . . . we're still here after more than 20 years!
Tooling up
As regards tools, within Resources > Air Frames is a brief article titled; Tooling Up.
This article serves as a reminder – or checklist – of what you'll need, tool-wise.

![]()
Anyway, after a few enjoyable hours of assembly, later followed by radio setup, when you’re done, you’ll have really gotten to know your model.
Completion goal
This starboard view of a flight ready P6 shows a model equipped with engine and avionics plus a few options. Options include the output shaft stabilizer assemblies.
Output Shaft Stabilizers are a twofer benefit-wise. This, because you get more precise control by reducing free motion of the servos rocking under load on their rubber mounts (the intended purpose of the stabilizers). But the bearing mounts (bridges) also serve as guards to protect servos in the event of a crash.
And no, we don't mention crashing to be negative (though shit does happen). Instead, it's mentioned as a reminder the scouting handbook does say, be prepared!

![]()
Also, eyeball the above photo how the flight pack is wrapped in protective foam. Then it's strapped beneath the radio platform. Meanwhile, the receiver’s also been wrapped in protective foam, and similarly strapped on with Velcro, but this time on top of the platform.
This has proven to be a good arrangement for installing the gear on your model.
Anyway, protection for the three cyclic servos are included in the package. Installation is a doodle and can be done after you've flown the model.

![]()
Birdwalk
Note; the Duralite regulator Zip tied to the side frame in the above photo was a great piece of gear back in the day (ca 2007 when this photo of the Pantera prototype was taken). At that time, the modeling community was transitioning from avionic packs using nickle-based chemistry (5-6V) to the then new lithium chemistry (+8V fresh off charge).
So because everyone still owned standard voltage servos, this widget (or one like it), was standard fare for protection against burning up avionics (servos and gyros). Of course, these days, we've learned regulators are just one more added complication to the component failure-chain ahead of a smoking hole in the ground. Or put another way, simpler really is better.
Especially as lithium-based packs have such a flat discharge curve, folks claiming to be able to tell a difference in servo performance at the end of a flight versus the beginning are, in our opinion, full of shit.
If you're curious to learn more, review this article: The case against synthetic voltage
More options
By the way, beyond the output shaft stabilizer kit, other options include the Snorkel Air Filter assembly fitted to the engine. And while in this photo, the model’s sporting an aftermarket air filter in hopes of avoiding the expense of designing our own, after negotiations for buying them in bulk fell through, we moved ahead with rolling our own.

![]()
Turned out to be a good thing because the included filter actually flows better! Added to which, maintenance is dead nuts easy because when the element is clogged, you just rinse it in a bit of fuel and reinstall. This, versus waiting until you have shop air to blow it out.
Note; when the alcohol in the fuel evaporates, the residual lubricating oil perfectly preps the open cell foam element for optimal particle capture! Anyway, if you want to learn more, review the article; Protecting your investment
So who's it for? You!
Ultimately, what you're getting into is a quick build, 600-class nitro powered model helicopter. One that flies really, really good and won't break the bank. Moreover, depending on how you choose to equip your model, it'll take you as far along the journey of rotary-flight mastery as your heart desires!
Interestingly, it’s not just heli-guys who enjoy flying a P6. Turns out there are those in the fixed-wing community who also view it as a great tool. What for? In preparation for competitive flight!
This is world class pilot Bill Hemple surrounded by his giant scale competition models. We're proud of this photo because he's sharing his joy by holding his P6 up as it were a trophy! And yes, from this you might reasonably conclude . . . he rather likes it!

![]()
Flight goals
Ultimately, whether your goal is learning to hover and fly, or to reach fulfillment by making your model look and fly like a full scale helicopter, this model is one that’s fully capable of helping you fulfill the dream, whilst not holding you back.

![]()
F3C schedule of maneuvers
Moreover, if your dream includes practicing the F3C schedule, the P6 will go there, too. Specifically to F3C, component maneuvers that are fun to fly include loops, rolls, pirouetting turns, and inverted flight. Then taking things to the next level, you'll practice combining bits of these into a routine of set figures for the judges!
In this next photo, a P6 flies left to right performing a roll against the backdrop of a gorgeous blue sky. Do it right and it doesn't get any better than this!

![]()
So along the way what you’ll discover is a P6 makes a fine practice machine for F3C class maneuvers. It's great for training because it’s so steady and predictable. In fact, many pilots have made use of their P6 as a tool to level up their skills.
This, even after investing the significant sums required for a pair of full-on F3C machines (where each sets you back 5X the cost of a P6-build). Reasons include the P6 is more economical to fly, and handles the schedule of maneuvers perfectly even in wind that would ground smaller models.
Scale builds
As regards scale builds, an alternative approach to flying with the stock sport canopy involves slipping the mechanics into a scale fiberglass fuselage. If this is more your cup of tea hotdogging, then your P6 will be there for you . . . and won't hold you back!
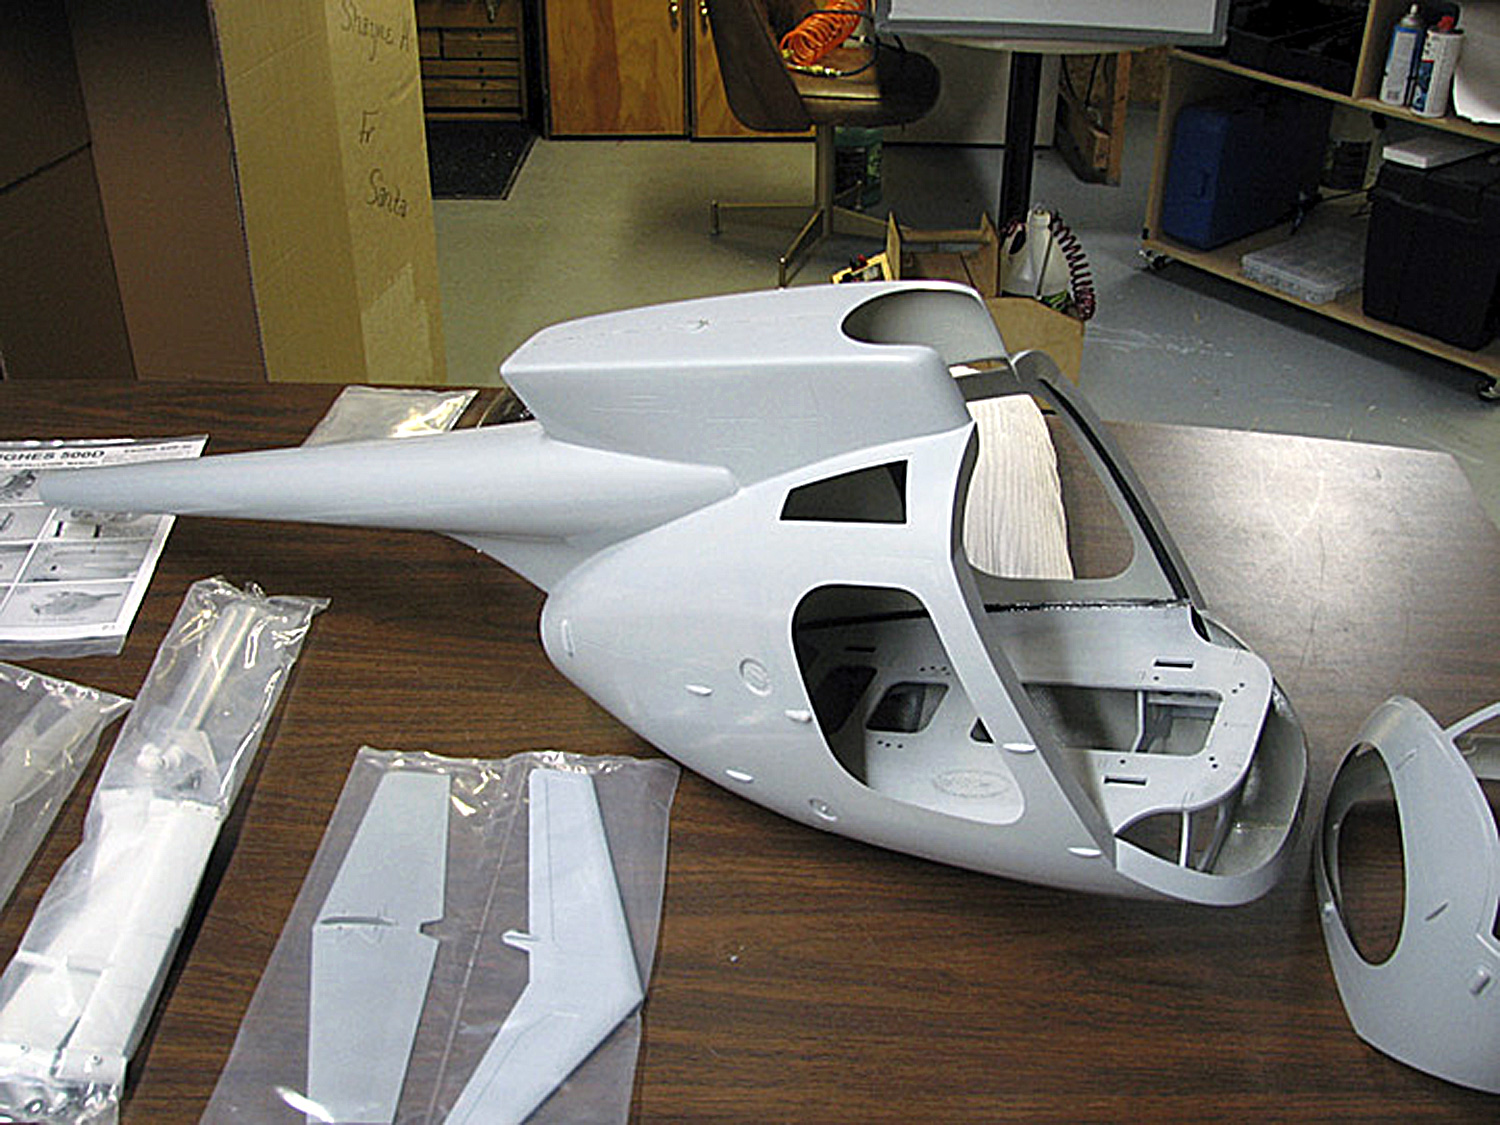
While there are many available rotary-wing aircraft upon which to base your dream build, popular ones include the Hughes 500D, Jet Ranger, and more. The Hughes, especially, is good because it's so spacious and easy to work on. These characteristics combine to make this an excellent choice as your first scale model.
![]()
Thus, if your dream includes scale builds like this gorgeous Hughes 500D, then your next step is shopping for a fiberglass fuselage. And while you can elect to use 600-class versions, consider investigating the larger universe of available 700-class fuselages for installing your mechanics, instead.
Note; we make this last easy with an optional 700-stretch kit The benefits of a 700 include easier installation (roomier to work in), and far greater visibility (bigger models are just easier to see).
Scale color schemes
Final thought; scale models are especially great when clubs are raising money. Like at a mall show or local library. It's true both for the benefit of the club's finances, or its favorite charity, like Toys For Tots.
Basically, modelers earn bonus points within the community (meaning positive recognition of modeling) simply because someone replicates a locally known helicopter. Examples include your county's News, EMS, SAR (search and rescue) helis, or one sporting the color scheme of the local sheriff's department.
Regardless of your color scheme choice, it's win-win at the local level. After all, you can never have too many friends when flying fields are at risk!

![]()
Note; if you find this idea especially appealing, then eyeball our fuselage how-to article where we share tips and tricks for installing P6 mechanics within a fiberglass fuselage.
Wrap up
You place your order, the model arrives in a few day, and if you downloaded the manual and other documentation to get an advanced idea of what's involved in the build, then after it arrives, if you get cracking, it's ready a few hours later. Once setup, you're ready for test hops to get the blades tracked and ensure everything is ready. And just like that you're ready to have a blast. Enjoy!


